How to Patch Hardwood Floors
Hardwood floors are durable; they stand up over time, and weather wear and tear well. That’s one of the reasons that so many people opt for hardwood floors in a new home. Despite their durability, wood floors can be damaged through mistreatment, or even common wear and tear. Luckily you can patch hardwood flooring.
Some of the most common damage is done through home remodeling, spills and stains on floors where the finish has worn away, or cracks and holes in the floor. However, some damage is accidental; for instance if you’re widening a hallway or adding on to your home, you may uncover flooring that is in disrepair.
What It Takes to Patch Hardwood
Patching a hardwood floor is not the simplest of tasks. It takes time and patience. It also takes some skill and level of comfort with both circular and miter saws. If you’re not comfortable cutting into the existing floor in order to patch a hardwood floor, it’s best to call in professionals before you end up with more repairs to make.
Many of the newer hardwood floors are created with a tongue and groove implementation for easy installation. The nails used in installing a tongue and groove hardwood floor are nailed at the base of the tongue and at an angle. While this makes the finish of the floor look good with no visible nails on the surface, it does make the process of removing floor boards a difficult challenge.
Step 1: Removing the Damaged Board
The first step in patching a hardwood floor is to make two cuts down the length of the damaged board. Be sure not to cut into the boards that border it on either end. The two cuts should result in having even thirds of damaged board to pull out. Most hardwood floor depths are around three-quarters of an inch; this is the setting you should use on your circular saw. When making the two cuts, you’ll also want to guard against cutting into the subfloor. You may also want to protect the surrounding floor using masking tape, cardboard, or building paper to prevent any scratches as a result of the shoe of the saw contacting the floor.
By using a hammer and a chisel, you can cut out each of the ends that the circular saw didn’t reach. Once you’ve cut all the way through each end, start prying up the cut pieces, beginning with the center piece. You can use also use the chisel to help pull up the cut pieces and then remove the nails as well.
Step 2: Replace the Board
After you’re removed the damaged board from the floor, you’ll need to find a replacement piece. If you don’t know the type of wood used in your hardwood floor, a home improvement store or lumber store should be able to match the type of wood originally used. You’ll also need to match the stain used on your hardwood floor as well.
Measure and cut the replacement piece of floorboard to fill the open space in the floor. Remember to cut it to fit snugly so that there are no gaps. It’s recommended that you cut slightly shorter on each end of the replacement piece in order to allow for the wood to expand and contract. It may be necessary to resurface the portion of the floor that was damaged by sanding the area. Do this before you dry test the replacement piece. After making the cuts, it’s important to also cut off the bottom half of the groove on the replacement piece so that it goes into place against the other boards properly. If your floor features boards which are micro-beveled, sand each top edge of the new piece at a 45 degree angle to match the existing boards.
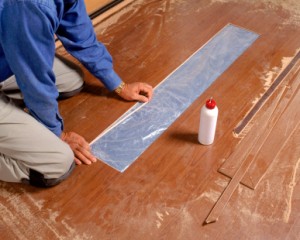
Step 3: Secure the Patch
Securing the new floorboard can be done by either nailing or applying adhesive. Nailing the boards must be done by hammering directly down on the top of the floorboard. Finish off the nails by filling the holes and sanding. If you choose adhesive, place the glue on both the groove and the tongue on the neighboring boards as well as the replacement piece. The adhesives dry rapidly so work quickly in order to get a secure fit. Weight the board as well as the surrounding boards until the replacement piece has dried in place.
Step 4: Make the Patch Blend In
A mentioned earlier, you’ll need to match the stain to the existing floor unless you’ve purchased a prefinished replacement piece that corresponds with the already installed pieces of the hardwood floor.
Taking the time to properly patch a hardwood floor is important and should not be rushed through. During the process adhere to proper safety by wearing safety goggles and clean the area thoroughly after any sanding. This way you won’t leave any sawdust, woodchips, or dust in your finished, newly stained and repaired floor.