How to Install Glueless Click Engineered Hardwood Flooring

Before You Get Started
Engineered glueless-click wood flooring can be installed directly over most existing floor coverings except carpet. Any wood flooring or subflooring glued to concrete must be removed before installation. Here’s what to know before you start a glueless click installation.
Acclimation
- Products must be acclimated in climate controlled conditions for a minimum of 48 hours before installation can begin.
Sub-floor Preparation
Approved Subfloor Types:
- APA approved 5/8″ minimum thickness, preferred 3/4″ or thicker exterior grade plywood, 16″ on center 2″x10″ joists. NOTE: When installing and fastening approved plywood, please refer to specific structural panel manufacturer’s instructions.
- 3/4″ (23/32″) OSB 16″ on center, 2″x10″ floor joists properly nailed. When installing hardwood over engineered joists and truss systems that are spaced wider than 16″ on center, it may be necessary to reduce excessive deflection by adding an additional layer of subflooring or use additional cross-bracing to stiffen the system.
- Concrete slab- Engineered Click Wood Flooring products can be installed on all grade levels. Concrete slabs must be clean and dry — less than 3 lbs. /1000 sq. ft. / 24 hours per CCTM.
Subfloor must be:
- CLEAN – Scraped or sanded, swept, free of wax, grease, paint, oil or other debris.
- SMOOTH ⁄ FLAT – Level within 1/8″ in a 6-foot span. Use cement base leveling compound, with no less than a 3000 p.s.i. rating, to sand high areas or fill low areas.
- STRUCTURALLY SOUND – Nail or screw any loose areas that squeak or reveal movement. Replace any damaged subflooring or underlayments.
- DRY – Moisture content of a wood subfloor must not exceed 12% prior to installation of wood flooring. There should be no more than a 4% difference in moisture content between the flooring to be installed and the existing wood subfloor.
Remember: To insure that all job site requirements have been met, all moisture testing must be performed before and after the wood has been acclimated 48 hours.
Wood Substrates: Test the moisture of the wood substrate using a calibrated moisture meter which, according to the meter manufacturer, has been approved for testing wood moisture. The reading of the wood substrate should not exceed 12%, or the moisture content of the wood substrate and the flooring product being installed should not read more than a 4% difference.
Concrete Slabs: Prior to installation of the hardwood flooring, all concrete subfloors must be tested for moisture content. The moisture content of the concrete subfloor must register as dry by any test method used.
Note: Before installing new hardwood, pre-existing, wood panels or strips must be removed from the concrete slab.
- Use an approved calibrated concrete moisture meter as a preliminary measurement for moisture such as Delmhorst Moisture Meter or Tramex Concrete Moisture Encounter. Follow the manufacturer’s specific calibration requirements. Concrete moisture meter readings in excess of 4% moisture content will require additional testing as noted below.
If you have determined that the slab may have excessive moisture, Calcium Chloride and PH alkalinity tests must be performed to determine the vapor emissions and alkalinity levels in the concrete floor. Test evaluations will determine the corrective measures that will need to be taken.
- Perform a Calcium Chloride test according to the manufacturer’s instructions. The maximum acceptable reading is 3 lbs. /1000 sq. ft. /24 hours for moisture emissions.
- Perform a PH Alkalinity Test according to the manufacturer’s instructions. A pH reading of 6-9 on a pH number scale of 1-14 is acceptable.
- If the test results exceed these readings, the concrete slab should be sealed with an appropriate sealer that will correct high emissions. Follow the sealant manufacturer’s recommendations.
- Also check all site drainage to make sure all exterior water flows are directed away from the job site’s building foundation.
Installation on Plywood and Wood Substrates: Subfloors should be constructed of 5/8″ or thicker plywood when installing directly over 16″ on center 2″x10″ joists. Plywood sheets should be laid with grained outer plies at right angles to joists. Adjacent rows should be staggered every four feet and nailed with 7D or larger nails every 6″ along each joist. When installing new hardwood flooring directly over an old wood or strip wood floors sand any high spots. Refasten the old floor with screws to eliminate squeaks or loose boards. The moisture content of the wood or plywood subfloor should not exceed 12%.
Glueless Click Installation Over Radiant Heated Sub-floors:
- Some species of engineered wood are approved for floating installation over radiant heat (e.g. oak, ash, hickory and walnut) while others are not (e.g. Jatoba). Check the manufacturer’s warranty to make sure.
- Nail or Staple Down installation methods are not recommended for radiant heated subfloors.
- Radiant heating systems used must be designed and controlled by the system manufacturer specifically for hardwood flooring. The systems must include an outside temperature probe and surface temperature controls.
- The end consumer should be aware that minor gapping between wood planks during the heating season is a normal occurrence with hardwood flooring installed over radiant heated subfloors.
- Proper humidity controls within the home or business will help to minimize the natural wood reaction to seasonally changing climate conditions.
- Indoor climate should be maintained between 60° – 80°F with a relative humidity range of 35% – 55%.
Adhere to the following guidelines for a successful installation over radiant heat:
- Newly installed water type radiant heated flooring systems should be in operational mode with the temperature set between 64°F – 72°F for a minimum of 4 weeks to insure that all subfloor moisture has properly dried.
- Older water type radiant floor heat systems should be fully pressure tested, properly maintained, and set to a minimum of 64°F for at least 4 days before flooring delivery, acclimation, or installation processes may begin.
- All radiant heating systems must be set to room temperature at a minimum of 64°F for at least 4 days before flooring delivery, acclimation, or installation processes may begin.
- Using an accurate wood moisture meter, always check wood subfloors to insure that the moisture content is less than 12%.
- Concrete subfloors must register “dry” using a reliable concrete moisture meter.
- The pH level of concrete subfloors should register between 6 and 9 on a 14 point pH scale.
- Sub-floors must fully comply with these “dry” requirements before proceeding with the delivery, acclimation, or installation of the wood flooring at the job site.
- Regulate the job site to insure that the relative humidity is between 35% and 65%, and that the temperature is between 60°F and 80°F throughout the flooring delivery, acclimation, installation and any required curing processes.
- Deliver and acclimate the engineered hardwood flooring for at least 48 hours before installation begins.
- Install the hardwood flooring according to the instructions that pertain to the product.
- After completing the installation, do not change the radiant heat setting for 48 hours.
- Throughout the life of the installation so that the hardwood flooring can adjust to the temperature changes in a gradual manner, 3 to 5 degree daily increments must be used when adjusting system temperature for either upward or lower adjustments.
- Never raise the flooring surface temperature setting above 85°F.
Preparation
1. Try to run planks parallel to main light source. T-molding is only required for rooms of more than 1,040 sq. ft. (see figure 1)
2. Roll out just enough underlayment for the next few rows of planks you are installing. When installing over concrete, roll the underlayment up the wall about two inches. The seams should be butted together and taped with clear plastic tape. Do not tape the seams when installing over wood subfloors (see figure 2).
3. Undercut doorjambs for a professional fit. Doorways less than 6′ wide require T-Molding (see figure 3).
4. Do not store cartons near heating/cooling ducts or direct sunlight (see figure 4).

Typical Tools Required
- Broom
- Electric Saw (carbide blade)
- Eye and Ear Protection
- Glue
- Hammer
- Painter’s Tape
- Pencil
- Pull Bar
- Straightedge (6 ft)
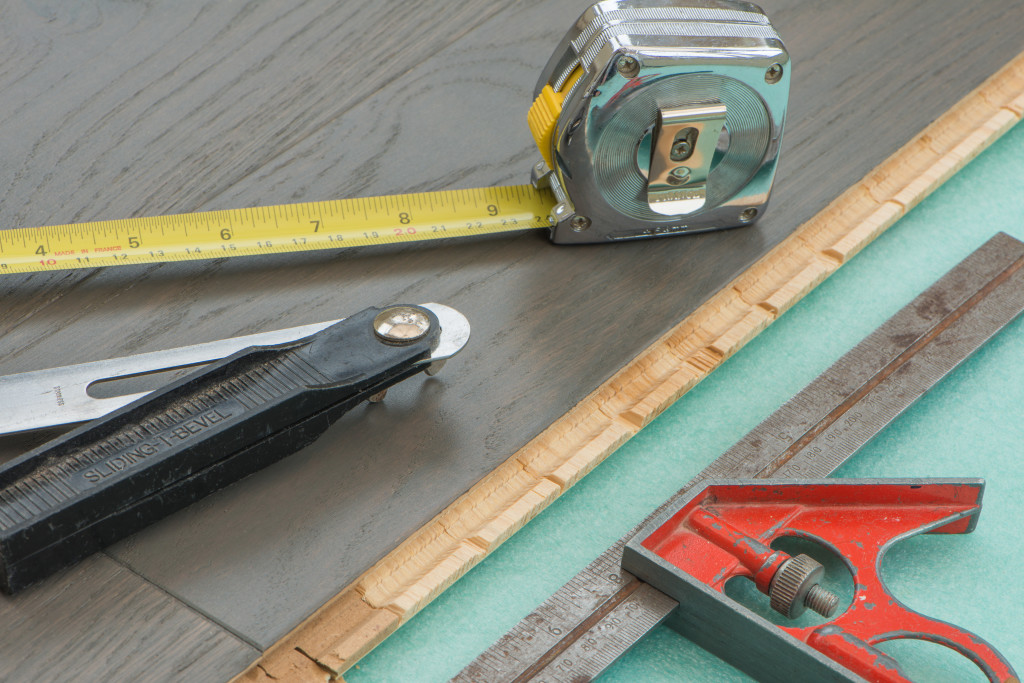
- Tape Measure
- Utility Knife
- Utility Knife
- Wood Chisel
Glueless Click Installation Steps
- The width of the first row of planks should be approximately the same width as the last row. This may require cutting the first row plank to a shorter width. Measure across the room (inches) and divide by the width of a plank to see how many full width planks will be used and what size width will be needed for the last row. The last row should never be less than 2″ in width.
- Use 3/8″ spacers to maintain the proper expansion gap around the entire perimeter of the floor. Quarter Round molding will cover this expansion gap.
- IMPORTANT: this 3/8″ gap must be maintained around cabinets, pipes, toilet flanges and any other obstacles in the floor.
- PRIOR TO INSTALLING EACH BOARD, INSPECT CAREFULLY FOR DAMAGE.
- Do not install a damaged plank. If you have any concern about the product fit or finish, call your dealer immediately.
- Check groove on plank to make sure it is clean and free of debris.
- Follow installation steps [1] through [15].
1. Facing the board, begin the tongue 1/4″ spacer wall tongue installation in the left-hand corner. Place the plank a minimum of 3/8″ from the left wall. Use the installation spacers throughout all perimeter areas to insure the correct expansion space is maintained (see figure 5).

2. Assemble the starting row of planks by applying a 1/8″ bead of tongue and groove adhesive on the bottom groove lip of each END seam plank. Place each plank end firmly into the end seam adhesive, position and tape the seams with painter’s tape, or weight them down to insure they remain flush while the adhesive sets. Use a clean, soft cloth to carefully clean up any excess adhesive on the surface of the planks. Remember, it is necessary to use adhesive on the end seams of the FIRST ROW ONLY! If the end seams of the first row are taped securely, it will not be necessary to wait for the adhesive to fully set before continuing with the rest of the installation (see figure 6-8).

Start with tongue side against starting wall working left to right when facing the starting wall.
3. If the starting wall is uneven, the planks must be adapted to its contours. You can scribe the contour of the wall onto the first row of planks using a 2″ square block and a pencil following along contour of the wall. Do not forget to allow for the minimum 3/8″ expansion space from the wall. Disassemble the first row, cut the planks along the line you have drawn, and then reassemble. You will still use the spacers to maintain the expansion space along this wall (see figure 9).
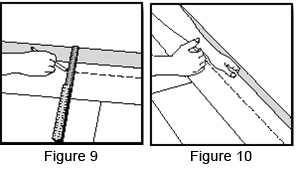
4. Now remove the first row. Lift the planks a few inches and tap along the joint. Cut the planks as required. the tap along the joint (see figure 10).
5. Replace the first row by inserting planks from left to right. Press the first board with the groove toward the edge of the planks that are already in position. Remember to glue the end seams as in figure 11.
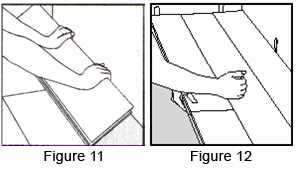
6. If you wish to remove the flooring, just lift the planks a few inches and tap along the joint (see figure 12).
7. Place the plank face down with the short side (without the locking strip) towards the wall. The remaining expansion space should be at least a minimum of 3/8″ from the wall. Draw a pencil line where the plank is to be cut (see figure 13).
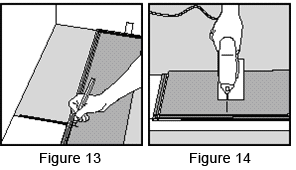
8. Place the final plank face down on the work surface and cut to size with a power saw. If you are using a hand saw, use a fine-toothed blade, and cut the planks face up (see figure 14).
9. Use a cut piece of board from the previous row to start the next row. This starting plank section must be at least 8″ long. If the piece is too short, start with a new board. Cut the new board in one third, one half or two thirds length sections, depending upon what is required to maintain the random stagger from one row to the next. Always ensure that the end joints are staggered at least 12 to 16 inches from one row to the next (see figure 15).
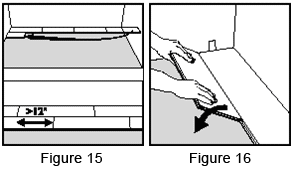
10. Place the plank at an angle against the plank in the previous row. Press the edge forward against the previous row, and then fold down at the same time (see figure 16).
11. Connect the planks in following rows by aligning the end seam of each plank directly above the end seam at the preceding plank Insert the long side seam at a slight angle first, and as the top surfaces meet, rotate the plank down into the locked position (see figure 17).
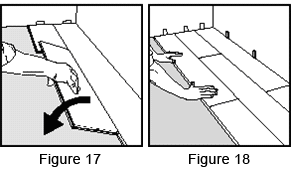
12. The distance to the walls can be adjusted when three rows are completed. Remember to place the flooring a minimum of 3/8″ from all walls or other vertical obstructions such as cabinets, pipes, or columns (see figure 18).
13. Measure and cut the planks in the last row to fit. Remember to allow for a minimum of 3/8″ expansion space from the wall (see figure 19).
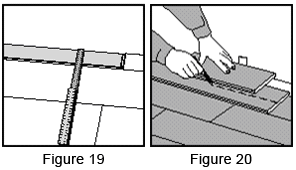
14. Use a full width scrap plank and 3/8″ spacer to mark your cutting line on the last row (see figure 20).
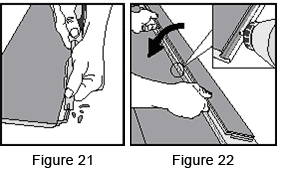
15. In areas such as a doorjamb or cabinet kick base where planks cannot be angled to lock into place, use a wood chisel to remove the locking ridge from the bottom of the plank groove. Apply a 1/8″ bead of tongue and groove adhesive to the bottom groove, and gently tap the plank into place using a pull bar and hammer. Next, apply enough strips of painter’s tape across this seam to hold the joint securely in place until the adhesive sets. Using a clean, soft cloth, carefully clean up any excess adhesive on the surface of the planks (see figures 21 – 22).
Starting the Installation
- Repeat the process of using random length start planks (minimum of 8″) to ensure a more natural look.
- Randomly pull planks from 3 cartons at a time to ensure random appearance. Use cut pieces from the end of each row as starting planks for the next row. Always stagger end joints a minimum of 8″ and make end joints random so as not to show a repeating pattern.
- All joints should be a tight fit with no gaps. Stop and reconnect if a joint is not tight or if all edges are not even with adjacent planks. These planks can be engaged and disengaged several times if needed to help make a correct installation.
- When cutting the last row, place a full row of planks directly on top of the previous row of installed planks keeping the tongue in the same direction as that of the installed planks. Use the full width of a scrap piece of plank as a guide. Place a pencil next to the edge of the planks and trace a line following the contour of the wall. Cut planks on the pencil line and then connect the last row. Facing the starting wall, start with tongue side against starting wall working left to right.
Special Circumstances
Doorways: Attempting to continue installing rows through a doorway into another room can be difficult because the narrow opening is a very small base upon which to continue consistent even rows into the next room.
T-moldings are available to install in doorways when joining flooring room to room: When using the Floating installs method, every doorway less than 6 ft. wide must be transitioned using a T-molding. Floating flow-through installations are allowed only if the total length of the floor does not exceed 40 ft. and the doorway is 6 ft. or wider. (With a flow-through installation, the floor continues from one room to another without a threshold molding between the rooms.)
Pipes, vents and other fixed objects: Each can be unique, but the general rule is to measure very carefully before you cut and remember to leave a 3/8″ expansion gap between the object and the flooring. Cover expansion gaps with molding, vent covers or pipe rings when the floor is complete.
Moldings, Trim & Transition Pieces
Installation Tips:
- Moldings should be acclimated for 48 hours.
- Moldings that are to be secured with nails or fasteners must be predrilled to avoid splitting.
- The tool of choice for cutting hardwood moldings is a 10 or 12″ motorized miter saw with pre-set adjustments for the basic miter cuts at 22.5°, 45°, and 90°. For the best cuts, use a carbide tipped blade. Be sure the saw blade is positioned to cut into the finished face.
- When installing Wall Base molding, eliminate the need to putty multiple holes on the molding by placing the bottom nail below the finished line of the Quarter Round.
- On Wall Base or Quarter Round moldings, never restrict the hardwood floor’s natural contraction/ expansion movement by driving the fasteners at a downward angle. Attach the moldings to the wall or vertical surface.
- Always splice with miter cuts instead of butt cuts. Choose the direction of the miter by cutting the molding with the long point oriented in the same direction as your natural line of vision when you enter the room.
Wallbase – Borders the wood floor at the base of the wall to give the room a finished look. Wallbase along with the Quarter Round conceals the required expansion space between the wall and the hardwood flooring. It is also sometimes used under cabinets and toe kicks.
Quarter Round – Conceals the required expansion space between the wall / wallbase and the hardwood flooring. It is also sometimes used under cabinets and toe kicks where a wall base won’t fit or at the base of the stairs to provide a subtle blend between the floor and the wall or vertical surface.
Threshold – Used at exterior doorways as a transition between flooring and the doorway threshold. It also can be used to transition a wood floor to different floor types, such as high pile carpeting or tile, to create a more exact fit. Another typical use for a threshold is to conceal the expansion space between the flooring and a vertical surface such as fireplace hearths and sliding glass doors.
- Installation: Lay the threshold molding in place to determine a proper fit. The threshold molding should overlap the flooring by 1/2″ to 3/4″ leaving the balance for expansion. To attach the threshold, nail into the subfloor behind the lip of the molding. Do not obstruct the floors expansion space when nailing.
T-Molding – Doorway molding used to join two wood floors in adjoining rooms. Also used when making transitions from a wood floor to another floor that is approximately the same height, such as ceramic tile, hardwood, or laminate floors. T-Moldings are also used to provide expansion joints when a floor dimension exceeds the length or a width of 40 feet.
- Installation: A space between the two adjoining floors is necessary to properly install the molding. This allows for the expansion space. Lay the T-Molding in place to determine the proper fit. Make sure to allow for the expansion space between the T-Molding and the tile. When installing over a wood subfloor, use finish nails to secure the T-Molding; when installing over concrete, secure with heavy-duty construction adhesive.
Overlap Reducer (Floating Method) – With hardwood floors that utilize the floating installation method, use an Overlap Reducer to join a hardwood floor with floors of different heights such as vinyl, ceramic tile, or low pile carpeting.
- Installation: To attached molding pre-drill and nail in appropriate 6″ to 8″ intervals. Do not nail less than 2″- 3″ from the ends of either side. To attach the molding using glue, apply glue to the front edge of the molding. Apply one or two 1/4″ beads of construction adhesive to the subfloor and seat the molding in place. It is important not to attach the reducer directly to the floating floor to allow expansion and contraction.
Overlap Stairnose (Floating Method) – Overlap Stairnose provide the proper transition for stairways or steps which have hardwood floors that have been installed using the floating installation method. The Stairnose also provides the proper overhang for a transition from one floor level to the next, such as the step into a sunken living room.
- Installation: To attach molding, pre-drilled and nail in appropriate 6″ to 8″ intervals. Do not nail less than 2″ – 3″ from the ends of either side. Also apply glue to the front edge of the molding. Apply one or two 1/4″ beads of construction adhesive to the subfloor and seat the molding in place. All Stairnose moldings must be nailed and glued to secure the molding adequately. To allow expansion and contraction, it is important not to attach the reducer directly to the floating floor.
Note: THIS IS A GUIDELINE ONLY. CAREFULLY READ THE MANUFACTURER’S INSTALLATION INSTRUCTIONS THAT COME WITH YOUR PRODUCT BEFORE BEGINNING THE INSTALLATION.


John
Does click flooring go under new kitchen cabinets or butt up to them. I have been told to not put the flooring under the cabinets as it will buckle.
BuildDirect Product Expert Team
Hi John,
You will need to butt the floating floor up to the cabinets because they will be too heavy and the floor will not be able to expand and contract. Please let us know if you have any other questions!
Don Lewis
Planning on buying 1/2″ engineered hickory flooring. A rental place said that we could not use their nailer on anything less than 5/8″ in thickness. Are nailers available for 1/2″ , or what do you recommend?
BuildDirect Product Expert Team
Hi Don,
Thank you for getting in touch! We haven’t heard of any buildings restricting the use of a nail gun based on the thickness of the floor. You should be able to use a regular nail gun on the 1/2″ floor. Please let us know if you have any other questions!
Misty
I recently bought Jasper Engineered Hardwood and had it installed floating over concrete slab with underlay. The boards are sliding apart some now. What kind of glue do you recommend to hold the planks together?
BuildDirect Product Expert Team
Hi Misty,
Thank you for getting in touch, I’m sorry to hear about your flooring! I highly suggest giving us a call at 1-877-631-2845 so we can help figure out what is causing your floor to separate. It would be best to find the underlying issue and fix that rather than glue the floor back together then find it separates again. Please let us know if you have any other questions, we look forward to hearing from you!
Perci
Amazing guide! Proper installation leads to longer life time. I learn some info from your blog post. Thanks!!
Brian hale
I am thinking of ordering the hickory engendered hardwood flooring. Am I able to do this without using nails, or glue. Thanks
BuildDirect Product Expert Team
Hi Brian,
Our engineered hardwood floors that are not click lock can be installed by either gluing, nailing or floating. Because it is a tongue and groove product however, if you were to float it, you would still need to glue the boards together and float it over an underlayment.
Please let us know if you have any additional questions.
Noel Schacter
We purchased an oak engineered floating floor to go over in-floor electric heat cable. We have put a leveling compound over the cable and are now ready to install the floor. We are unable to find any information on if an underlayment is required/possible and if so what material should be used. We want to avoid any materials that might off-gas. It appears that you can lay the floor directly on the leveling compound but we are concerned about clicking noises.
Thanks in advance for any information you can provide.
Noel and Elizabeth
Pingback: How the wooden flooring is done?
jim morse
Hi planning on installing engineered wood in living-room,dining-room,hallway ,kitchen and stairs down to a landing.The stairs ( 7) has one side against a wall the other side is open.Question, how would i finish the open side,do i have to buy more bull nose and cut to fit? Thanks Jim
Tom Oak
Amazing guide/tutorial, really nicely layed out and I learnt quite a bit.
Thanks for the post 🙂
Agnes
Hi,
We installed engineered wood glue-less click over concrete with felt underlayment. The wood is beautiful but has clicking noise whenever we walk over. The installer told us it will go away after a month or so but now I doubt it. Is it true the nose will go away or is there any way to reduce the noise?
Rodney Noriega
Hi Agnes,
Perhaps you need to get a sound proofing underlay to eliminate/minimize the sound feedback. We have the Sound Choice 3 in 1 underlay (//www.builddirect.com/Flooring-Accessories/3-in-1-SoundChoice-Acoustical-Underlayment/ProductDisplay_10119_p1_10074922.aspx) that includes the vapor barrier, underpad, and sound accoustical barrier. If you purchased a regular underlay, it may not have the sound accoustical barrier which means your floor may have the clicking sound when you walk on it.
Rodney
Louisa
Hi,
after getting wet, one of our engineered oak boards has lifted in a corner. It is right in the middle of the floor so I assume we cant replace it without removing the whole floor? Is this correct? I have tried to glu it down but won’t work as the corner has slightly swollen. Can I nail the face down or will the wood split?
Thanks, Louisa
Lacey
We have a sunken living room and the stair to the room is 9′ long. The stair nose we can find is 8′ long. If we have to put a seam on the stair where should we put it? In the middle or more to the side? Thank you
brenda
we installed this type of floor in our home wall to wall. We have a propane gas stove that sits on a tile hearth in one corner of the room. We would like to move that back in the house, as we moved it out when the floor was installed. We are being told that we cannot place the hearth on top of this floating floor without saw cutting around it. Is this true? We really do not want to do this in case we ever move it out of the room and besides do not see the difference in weight between this stove and a large refrigerator setting on the same floor. can anyone advise?
thanks-
Rodney Noriega
Hi Brenda,
Thank you for your inquiry. In order for me to better answer your question, I do need to know what kind of floor you purchased. Did you buy the flooring from us? What are the dimensions of the flooring? By the sound of your explanation, I don’t see any problems of moving the stove around. But I would still like to know what type of flooring it is so I can give you a better response.
Rodney Noriega