How to Create a Kitchen Backsplash Using Ceramic or Porcelain Tile
You love the fixtures, flooring, and finishes you’ve chosen for your kitchen, but you can’t shake the feeling that something is still missing. To add depth and elegance to your kitchen, consider installing a ceramic or porcelain tile backsplash.
Gather Your Tools

A stylish backsplash will tie your kitchen’s design scheme together. (Brilliante Ceramic Wall Tile – Provence Collection in Beige Bisque)
Installing a tile backsplash requires a few tools you might not already own. To cut the tiles, you’ll need a wet saw, which allows you to trim the tiles so they align perfectly with the edge of your backsplash. Otherwise, you risk cracking the tiles. While you can invest in a new wet saw, it’s often cheaper to rent one from a local home center for the duration of your project. You also need:
- Masking tape
- Mastic adhesive
- Caulk and caulk gun
- Trowel
- Grout float
- Tile spacers
Select and buy the porcelain tiles. Overestimate the amount you’ll need since it’s not unusual to have 2% to 3% of the tile chipped or broken to some degree; you may also damage a few of the tiles during installation or your measurements may prove faulty. A minimum of 10% wastage allowance is generally recommended.
Prepare the Work Surface
Remove the current wall coverings, if any, as well as switch plates, artwork, and anything else on the wall’s surface. Sand down the wall with medium-grit sandpaper and wipe the wall surface with a sponge to remove any residual dust. Use masking tape to cover any areas, such as the top of the countertop, which you don’t want to come into contact with mastic and other materials.
Since every work surface is different, and every job could have different prepping requirements, it’s important to consult a professional if you have any installation questions. Making sure your work surface is prepped according to the Tile Council of North America standards will help ensure a quality installation.
Along with getting your substrate ready, you need to finalize your backsplash pattern. You can do a dry run by laying out your tile pattern on the floor or countertop. Rearrange the pieces until you approve of the design.
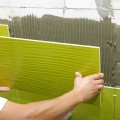
Apply the Mastic
Use your trowel to apply the mastic to a small section of wall — enough to accommodate about six tiles — and adhere the tiles to the mastic. Use tile spacers to maintain even joints between each pair of tiles. If possible, work out from the center of the backsplash so the edges feature the same tile widths.
Cut Tiles as Necessary
You’ll eventually reach a point where the full tile size won’t fit an area of the backsplash. This situation occurs most often on the edges of the backsplash and the areas that abut cabinets, window frames, and other elements of your kitchen. Use the wet saw to cut these tiles to the proper height and width, then apply them to the wall as you did the other tiles. Follow the manufacturer’s instructions on your mastic to allow proper time for the tiles to set.
You might want to add bullnose tiles to the bottom or top edges of the backsplash or include a more detailed mosaic pattern in the center. For example, stoves with a mosaic backing remain popular in kitchen design. Exercise your creativity, but keep in mind that highly detailed patterns and installations might need a professional.
Add Caulk and Grout
Clean all the tiles, then grab your caulk, caulk gun, grout, and grout float. Use caulk to seal inside corners of walls and apply the grout to the spaces between the tiles. The precise process varies depending on the brand of grout, so follow the product instructions carefully. Afterward, buff the tiles with a soft cloth to complete the project.
Adding a porcelain tile backsplash to your kitchen creates a distinct focal point and protects your walls at the same time. Choose from many colors and textures of ceramic and porcelain to match the overall visual design of your kitchen.
What other elements would you add to your kitchen to create stunning focal point?
Browse our selection of dynamic Wall Tile & Mosaics here. Discover endless décor possibilities.

Pingback: Ceramic Tile Installation Kitchen | Purathrive review
csstile
I agree with Len this is an over simplification of the installation of a kitchen backsplash. Some projects are for DIY but, this is not one of them given the high visibility of a completed kitchen backsplash which if done incorrectly will be display the imperfections for all to see. For less than $1K including labor, install materials and tile, dependent on the SF, hire a professional tile setter and enjoy the quality result!
Note: Make sure you get contractor references and see their work before you select one. There are many contractors who have no idea how to do a kitchen backsplash especially glass, mosaic or other custom features. There a are a lot of contractors who can do a decent job on a floor but a floor is totally different than a kitchen backsplash.
Len
My personal opinion is that this is no job for 99.5% of home owners doing a tile job for the first time. It is demanding as to visual quality and involves many cuts, often compound around such items as electrical boxes. We sometimes find detailing such projects very challenging. It is not a good idea to encourage consumers to get in over their heads.