How to Lay Carpet on Stairs and the Landing

Carpeting your stairs and landing is a stylish and functional investment in your home. Carpet creates a soft, inviting look that makes homes feel cozier and more comfortable. It also absorbs the impact of footsteps to quiet your home. Carpeted stairs and landings are safer than hard surfaces, as they’re less slippery and padded should falls occur. These instructions make it easy to install carpet on stairs and the landing. It’s a simple DIY job for most home handypersons.
Choose Your Carpet
The carpeting process begins with finding the right carpet. Stairs and landings are high-traffic areas, so your carpet should be easy to clean and made to last. Don’t take shortcuts with carpet with padded backing. While this kind of carpet is easier to lay, it will probably wear out quickly.
Measure and Cut Your Carpet Padding
Carpet padding, sometimes called carpet cushion, forms your carpet’s foundation. This squishy material extends the life of your carpet and helps it feel soft underfoot.
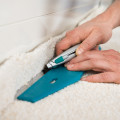
Measure each stair tread (the flat part where you step), riser (the back of each step), and your landing individually. Cut padding for each step and the landing. Your pieces should fit in between the tackless strips you’ll nail to the back of the treads, the bottom of the risers, and around the landing. Using a utility knife and straight edge provides the most precise cuts. Ensure you’re working on a surface that isn’t valuable to you, as it’s likely to get damaged.
If your staircase’s steps are all the same, you can make a template and cut all your pieces of padding from that. However, this won’t work for curved staircases or staircases near walls that aren’t plumb. For differently sized or shaped steps, you’ll need to measure each piece separately.
Affix the Tackless Strips to Carpet Stairs
Tackless strips are wooden strips with small carpet tacks attached. These strips get their name because when you use them, you don’t need individual tacks to make your carpet stick. Tackless strips make carpet laying easier for homeowners interested in DIY. When nailing down tackless strips, put a piece of heavy cardboard between the strip and the baseboard. The cardboard will act as a buffer, protecting your baseboard from any damage your hammering might cause. Nail down tackless strips to each carpet riser and the back of the treads. A spacer made from two tackless strips taped together can help you determine how high the tack strips need to be. Then, hammer more tackless strips into the walled sides of your landing. Add more strips to the front of the upward side and the edge of the downward side of the stair riser’s base.
Put Carpet Padding in Place
Take your pieces of carpet padding and staple them in place with a hammer stapler. Start in the middle of each stair tread and staple along the length of the pad, just in front of each tackless strip. Wrap the padding around the front of the stair and down the riser, so it fits tightly without creases or lumps, before stapling it down.
Measure and Cut Carpet for Stairs and Landing
Next, you’ll need to measure the stairs and landing so you can cut out the carpet you need. It’s important to cut out separate pieces, rather than using just one long strip of carpet, even if your staircase is straight and even. A single piece will come loose quickly and become a tripping hazard. Add 4-6 inches to your width measurements to make sure you have enough carpet to cover the edges.
If your stairs are all the same, you can make a template to use for cutting each piece. If not, you’ll need to measure each one separately. Flip the carpet over, so the underside is up, and cut your pieces out using a utility knife against a straight edge again, ready for installation. Make sure each piece’s pile runs the same way, with the flow of traffic.
Install Your Carpet
Now it’s time to install your carpet, starting with your bottom step and working your way up to the landing. If you have several landings, you can simply repeat the steps below until your staircase is complete.
The French Cap method is the best process for installing carpet on stairs because it provides the cleanest finish. Another common method, called the Waterfall method, doesn’t fasten the carpet to the riser. While the Waterfall method is quicker and simpler, it’s worth taking time to master the French Cap method below for a more professional look.
Center a piece of carpet on the bottom edge of a step and use an awl to push it into your tackless strips. You want a clean line between the floor and bottom of the stairs. You should always use an awl, rather than your hands, to push your carpet down as the tackless strips are sharp enough to puncture your skin. When the carpet looks good, staple it to the riser, just below the tread. Make sure you don’t staple through the fold. Hide the staple impressions by wiggling the carpet tacker between the carpet’s nap.
Stretch your carpet with a knee kicker and carpet stretcher into the seam formed between the riser and the tread. Fold the carpet’s edges around the step. Use a rubber mallet and stair tool to fold the carpet down into the seam and secure it in place.
Repeat this process with every step until you reach the landing.
Lay the carpet piece down and stretch it from one wall to the opposite side. Hammer it down onto the tackless strips on each wall. Stretch the carpet to the back wall and stair riser and hammer these edges down. Put your carpet transition piece on the edge of the landing, stretch it out, and hammer it into place.
If you have any excess carpet, you can trim it with your utility knife.
Carpeting your stairs and landing takes some time, but it’s a relatively simple way to improve your home’s look and function.