Hardwood Moldings, Trims, & Accessories
Hardwood floors mean more than choosing a wood, grabbing some boards, and installing them in the room. Beyond the floor, people must take time to consider the various moldings or trims and accessories they will need to finish the look they are going for. Without moldings, trims and transition pieces, a hardwood floor job can look unfinished, drawing away from the beauty it adds to a room.
If installing a prefinished floor, most of them come with their own matching trim pieces to complete the job. Using an unfinished hardwood requires separate staining of unfinished molding and trim pieces in order to match the finished floor.
If installing engineered wood floors, you must also consider whether or not you’ll be using underlay and, if so, what the best choice is.
You may also need to consider what adhesive to use if going with either a glue-down installation (engineered wood or thin profile solid) or a floating glue-seam installation.
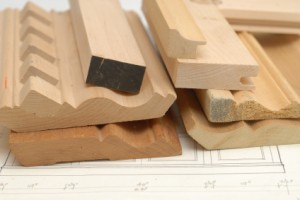
Moldings, Trim & Transitions
There are several different moldings and trim options designed to fit any flooring need. When installing hardwood floors, the following moldings may be required in order to complete the job:
- T-Molding: This molding is most commonly seen as a transition between a tiled floor and a wood floor, though it is also used to connect one wood floor to another.
- Reducer/One-Sided Reducer/Flush Reducer: This molding is typically used to level the flooring when connected to a floor with a lower height. It is also being used as a design element around fireplaces.
- Overlap Reducer: This molding is used with floating floors, transitions to carpet, and with floors of a lower height.
- Bi-level Reducer: This molding is used with solid hardwood floors to transition to carpet or other floors of a lower height.
- Baby Threshold/Threshold: This molding is used in areas where expansion is required, such as with sliding glass doors, but can also be used with carpet.
- End Cap/Square Nose: This can be used similarly to a baby threshold molding.
- Overlap Stair Nosing, Bull Nose: This is typically used with floating steps where expansion may be required.
- Flush/Square Edge Stair Nosing, Bull Nose: This is used as a transition for stairs.
- Quarter Round: This is commonly used around baseboards and fixed objects throughout a room.
- Shoe Edge Molding: This works just as quarter round molding, but does so with a smaller profile.
- Baseboard/Wall Base: This is used around the base of all walls in the room to cover the expansion gap space the flooring needs to breathe.
Underlayment
Underlayment serves as the barrier between the hardwood flooring and the subfloor. It is used primarily with engineered wood floors. Solid hardwood floors typically only use rosin/felt paper as an underlayment.
Depending on the type of underlayment, its purpose is to provide cushion between the floor and the subfloor, muffle sound (important for above ground installations) and/or block moisture from getting to the hardwood floor (especially important when installing over a concrete subfloor).
- Basic Foam: This is available in several different types, based on the manufacturer. Essentially, this is a layer of foam to be used with concrete floors with at or below grade level installations. It may come with a plastic layer as a moisture barrier or with an additional layer of sticky material to aid with installation.
- Sound Choice: This is an eco-friendly underlayment option that provides insulation to the flooring. It will reduce the noise associated with walking on wood floors while also working to keep the floors cooler in the summer and warmer in the winter. It has a vapor barrier to keep water from reaching the flooring as well.
- Floor Muffler: This will reduce the amount of noise produced by walking on the floors, but is not an eco-friendly product because it is completely synthetic.
- Cork: This is an excellent choice for those who are looking for a green underlayment option. It will work wonders to reduce the sounds from walking while also protecting the floor from moisture. It can be used for floating installations just laid over the subfloor, or it can be glued down.
- Proflex: This is an alternative to cork, but since it is used mainly with high rise buildings, it is suggested builders get approval with the appropriate homeowners association before using it. Commonly seen with concrete subfloors, this option both reduces moisture risk and sound from walking. It is pressed down with a peel off tape rather than glued down.
- Plastic Sheathing: A plastic sheet can be used on underneath whatever underlayment choice to add moisture protection. This option doesn’t provide much, if any, sound proofing.
- Vinyl: As with plastic, vinyl is an excellent option for moisture protection, but not so much for sound proofing.
- Rosin/Felt Paper: This type of underlayment does not provide a moisture barrier, or much sound proofing. This material was laid down when solid hardwood floors were being installed, to prevent drywall dust and other particles from getting to the installer’s eyes.
Adhesives
Solid hardwood floors that are ¾” thick must be nailed down to the subfloor. However, thin profile solids and many engineered hardwood floors may need to be glued down. Glue-seam floating engineered floors require adhesive to bond the tongue and groove edges together. There are many choices of adhesives available and it is important to choose the right one.
- Urethane Adhesives: These are the most commonly used adhesives for engineered and thin profile hardwood floor installations today. There are several different options out there, though they are not too environmentally friendly. It is important to check to ensure no adhesive is left anywhere on the wood after the installation and again in the proper day light. The adhesive can be cleaned up using mineral spirits.
- Water Based Adhesives: These adhesives are only to be used with engineered wood floors and are the best option for those who are concerned with environmental and health issues, though they do not always provide the best quality adhesion. Powder based adhesives are also available to mix with water. A damp cloth can be used to clean the adhesive before it sets. If it is fully cured, use mineral spirits.
- Floating Floor Glues: Many manufacturers make their own floating floor glues to be used to glue the seams of with their products. Each type of glue will have its own guidelines and recommendations for installation. These can be cleaned up with a damp cloth before the glue sets. Afterward, be careful when it comes to scraping the glue off other surfaces.
The best approach is to choosing the right adhesive is to follow the manufacturer’s directions.
Important Note: If using mineral spirits to clean up adhesive, ensure proper ventilation and perform away from any heat or flame sources.


Heather
We have manufactured laminate wood flooring that is installed and the adhesive we used for the joints is fine however…we are having a terrible time trying to find an adhesive to use for the transition boards to fill the tiny space between our tile and laminate floors and the space between our back door and our laminate flooring. I’m terrified about liquid spilling and getting between the laminate and the plastic barrier that is on top of the concrete. We used “liquid nails” in our first attempt to glue down the transition boards but my toddler decided to go and pull up on the board and was successful in destroying the bond/installation of the transition board…needless to say we didnt even bother trying to put the other boards in place. Now its time to potty train our toddler and I WANT THE TRANSITION BOARDS INSTALLED BEFORE HE HAS AN “accident” that leaks under the laminate wood floors. Does anyone have an adhesive they can reccomend for the transition boards?
Steve Smith
I know about undercutting baseboards, so I can tuck the ends of the boards underneath, still leave expansion room, but getting the ends out of site. My question is can I undercut in door jams? I don’t really know door construction but if I use the undercutting tool, will I weaken the door jam/frame structure or am I safe as long as I only go a little depth?
Georgianna
I will be ordering “wood looking” tile to install. Would you recommend a tile baseboard to go with it or that being a bit pricy, will a nice wood trim still accept it nicely?